

Dec . 07, 2024 11:35 Back to list
high quality diy differential pressure gauge
High-Quality DIY Differential Pressure Gauge
In various scientific, engineering, and industrial applications, maintaining accurate pressure measurements is crucial. One interesting tool that serves this purpose is the differential pressure gauge, which measures the difference in pressure between two points. While commercial differential pressure gauges can be expensive, creating a high-quality DIY version is both feasible and rewarding. This article will guide you through the intricacies of making your own differential pressure gauge, emphasizing components, construction steps, and tips for ensuring accuracy.
Understanding Differential Pressure
Differential pressure gauges work by comparing the pressure at two different points. This measurement can be pivotal in various applications such as monitoring filtration systems, HVAC systems, and fluid dynamics in pipelines. The primary function is to provide insight into the pressure drop across filters or to measure the operating range of pumps and compressors.
Essential Components
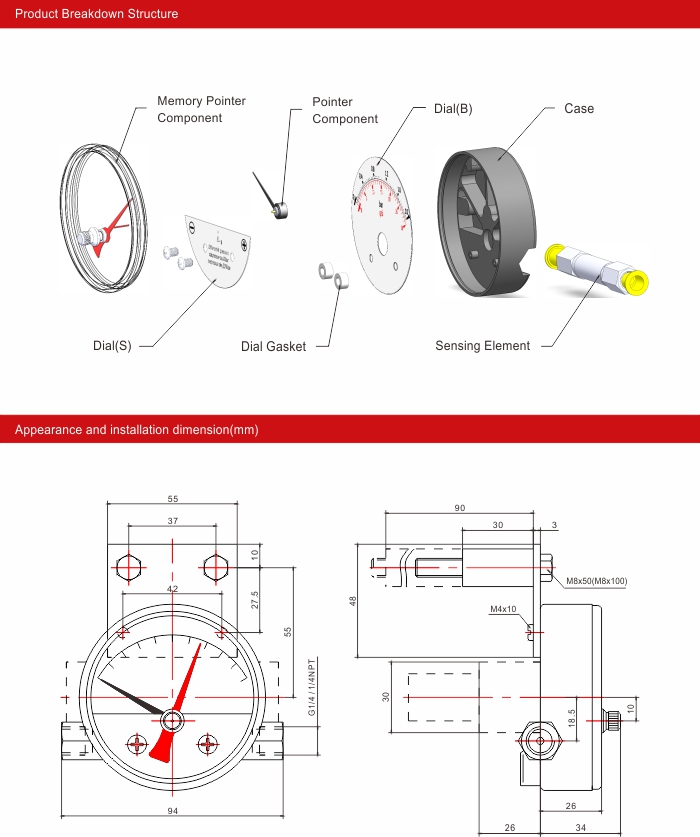
To construct a high-quality DIY differential pressure gauge, a handful of components are required
1. Pressure Sensing Devices You can use piezoelectric sensors or analog pressure sensors that can measure the ranges you are interested in, typically calibrated in PSI or inches of water column.
2. Microcontroller For signal processing, an Arduino or another microcontroller can be employed. This device will convert the analog signals from the pressure sensors into a digital format for display.
3. Display Unit An LCD or LED display will allow you to read the pressure difference easily.
4. Piping and Fittings Proper tubing or piping should be used to connect the sensors to the pressure sources. It’s essential to use materials that can withstand the pressure range you intend to measure.
high quality diy differential pressure gauge
Construction Steps
1. Set Up the Sensors Start by securely mounting the pressure sensors to the two points where you want to measure the pressure difference. Ensure that the connections are airtight to avoid any leakage that could skew measurements.
2. Connect to the Microcontroller Wire the sensors to your microcontroller, following the manufacturer’s guidelines for connections. Make sure to set up the appropriate resistors and pull-up configurations where necessary.
3. Coding Write a simple program in the Arduino IDE to read the data from the pressure sensors. Your code should account for calibration offsets and convert the analog readings to meaningful pressure units.
4. Display Integration Integrate the display module with your microcontroller. The display should show the differential pressure in real-time, updating at a frequency suitable for your application.
5. Calibration Finally, use your reference gauge to calibrate your DIY differential pressure gauge. Adjust the code or the physical setup as needed to ensure that your measurements are accurate.
Tips for Accuracy
- Environmental Considerations Ensure that your sensors are not exposed to extreme temperatures or moisture, which can affect their performance. - Regular Maintenance Regularly check for leaks and recalibrate as necessary, especially after significant changes in the environment or pressure systems they monitor.
- Quality Components Investing in high-quality sensors and materials will significantly improve the accuracy and longevity of your DIY gauge.
Conclusion
Creating a high-quality DIY differential pressure gauge is not only achievable but also a valuable skill that can save resources and enhance your understanding of pressure dynamics. Whether for personal projects, experiments, or industrial applications, building your own gauge allows for customized solutions while providing a hands-on learning experience. With the right components and a bit of patience, you'll have a reliable instrument to aid in your pressure measurement needs.
-
High-Precision 5 Valve Manifold Differential Pressure Gauge Suppliers
NewsApr.29,2025
-
High-Precision Diaphragm Vacuum Pressure Gauges Manufacturers & Quotes
NewsApr.29,2025
-
Omega Differential Pressure Gauges High Accuracy & Durability
NewsApr.28,2025
-
Low Pressure Differential Pressure Gauges Precision Solutions & Quotes
NewsApr.28,2025
-
Digital Diaphragm Pressure Gaauge Precision Measurement & OEM Quotes
NewsApr.28,2025
-
Differential Pressure Gauge China Price High-Accuracy & Best Quotes
NewsApr.28,2025